View Designer
Design the forms, panels and fields your team sees on companies, matters, cases and questionnaires, and manage dropdown lists.
This page needs administrator access. View Designer, Data Dictionary and Fields are in the Admin menu.
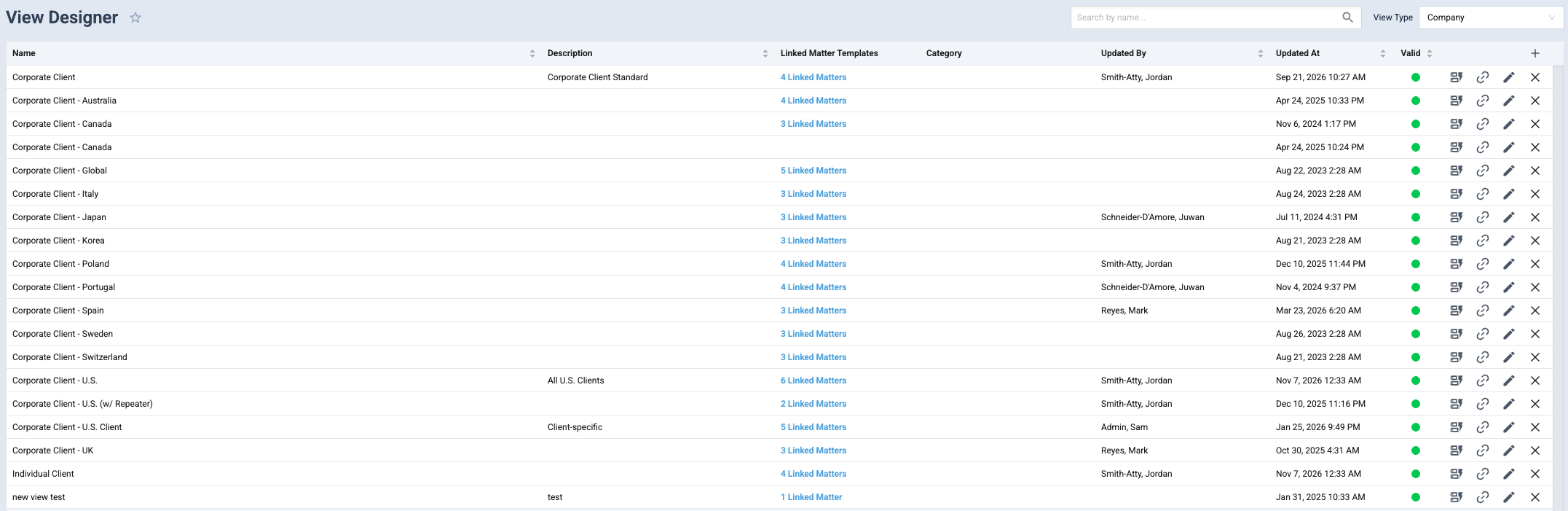
Every company, matter, case and questionnaire in Agnos is shown through a template called a view. The view decides which panels and fields appear in Browse, in what order, and how they behave. View Designer is where you build and change them.
Find a view
- Open View Designer from the Admin menu.
- Choose a View Type: Company, Matter, Case, Questionnaire or Dashboard.
- Search by name. The list shows each view's Name, Description, Category, who last updated it and whether it is Valid.
From a row you can open the Form Builder, change Linked Templates, Edit the view's settings or delete it.
Create a view
Click + and fill in the template view window:
- Name, Title, Description and Category.
- Layout: Classic or Modern.
- Duplicate From to start from a copy of an existing view.
- For questionnaires, Default OTP Enabled asks the recipient for a one-time code before they can open it.
- For cases, options such as Has intraLCA Integration or Timetracking Template turn on extra features for that case type.
Linked templates
Views are linked to each other so Agnos knows what can be created where. A company view lists its Linked Matter Templates, a matter view its Linked Case Templates, and a case view its Sub-Case Templates and Questionnaires. For example, an LCA can only be added under a case whose template links the LCA template.
Design the form
Open Form Builder on a view. The palette on the side has:
- Containers: Panel, Repeater, Repeater Group, Work Locations and, on case views, Timeline.
- Fields: fields that already exist for this view type, ready to drop in. On questionnaires these are split into Company Fields, Matter Fields and Case Fields, so answers go straight to the right record.
- Form Elements: new fields such as Text, Email, Phone, Number, Textarea, Date, Time, Checkbox, Radio, Dropdown, Upload and Rich Text.
- Predefined Elements: elements you saved from other views to reuse.
Drag items onto the form, select one to change its settings, and click Submit to save the view.
Field settings
Select a field to see its Properties and Validations. Common settings:
- Label, Helper Text and Placeholder: what the user sees.
- Optional: fields are required unless this is on.
- Read only, Disabled and Hidden.
- Dictionary: the dropdown list a Dropdown or Radio field uses, with Multiselect and Sort Alphabetically.
- For uploads: Multiple, Max Files, Accepted File Types, Max File Size (MB) and the Material Folder files go to.
- Default value: filled in when a record is created.
Conditions make a field or panel visible, or disabled, only when other answers match.
Default values from the parent record
A default value can copy a value from the record above:
- On a matter view,
{{company.fieldName}}copies a company field. - On a case view,
{{matter.fieldName}}copies a matter field. - Text fields can mix text and values, for example
{{case.street}}, {{case.city}}. - Dates can default to today, tomorrow, the first or the last day of the month.
Defaults are applied once, when the record is created. They never overwrite what someone typed, and they aren't applied when you edit an existing record.
Panels that copy another panel
In a panel's settings, Use from lets the panel show values from a matching panel on the parent record, and Same as lets it copy another panel of the same record (for example, a mailing address that is the same as the home address).
Dropdown lists: Data Dictionary
Dropdown and radio choices come from dictionaries.
- Open Data Dictionary from the Admin menu.
- Pick a dictionary on the left, or add a new one.
- Add items with a Label (what users see) and a Custom Code.
- Turn on Sort A-Z to show the options alphabetically everywhere.
Use Import Data Items to load many items at once, and Export to csv to download them.
Records store the dictionary item, not its text. Rename an item rather than deleting and recreating it, so existing records keep their value.
Template fields
Fields in the Admin menu lists every field defined for company, matter or case views, with its Name, Prefix, Label, Type and Dictionary. Use it to check or rename a field that appears on several views.
Field permissions
Who can read or change each field is set per role, not in the view. Open User Management, edit a role and use its Fields tab: choose the View Type, then switch Read and Write for each field, or use All Read and All Write. Click Save. See Users and roles.
Related
Last updated Nov 17, 2026
Still need help?
- Ask your firm's Agnos administrator. They manage users, permissions, forms and settings for your firm and can fix most access problems right away.
- Use Help in Agnos. Open your profile menu and choose Help to email your firm's support contact.
- Contact Agnos support at support@agnos.global. Say which page you were on and what you expected to happen. Never send passwords, and send client documents only through Agnos itself.